
So, you’ve found yourself in a bit of a sticky situation with your beloved Clarks boots. The sole has come loose, and you’re wondering how to fix it and get your favorite pair of shoes back on your feet. Well, fear not, because I’m here to guide you through the process of gluing the sole back on your Clarks boots, step by step.
Now, I know what you might be thinking: “How hard can it be? Can’t I just use any old glue?” Well, my friend, it’s not as simple as that. Gluing the sole back on a boot requires the right technique and the right adhesive. You don’t want to end up with a messy, ineffective repair job that leaves you slipping and sliding all over the place. So, let’s dive into the world of shoe repair and discover the best way to glue that sole back on your Clarks boots.
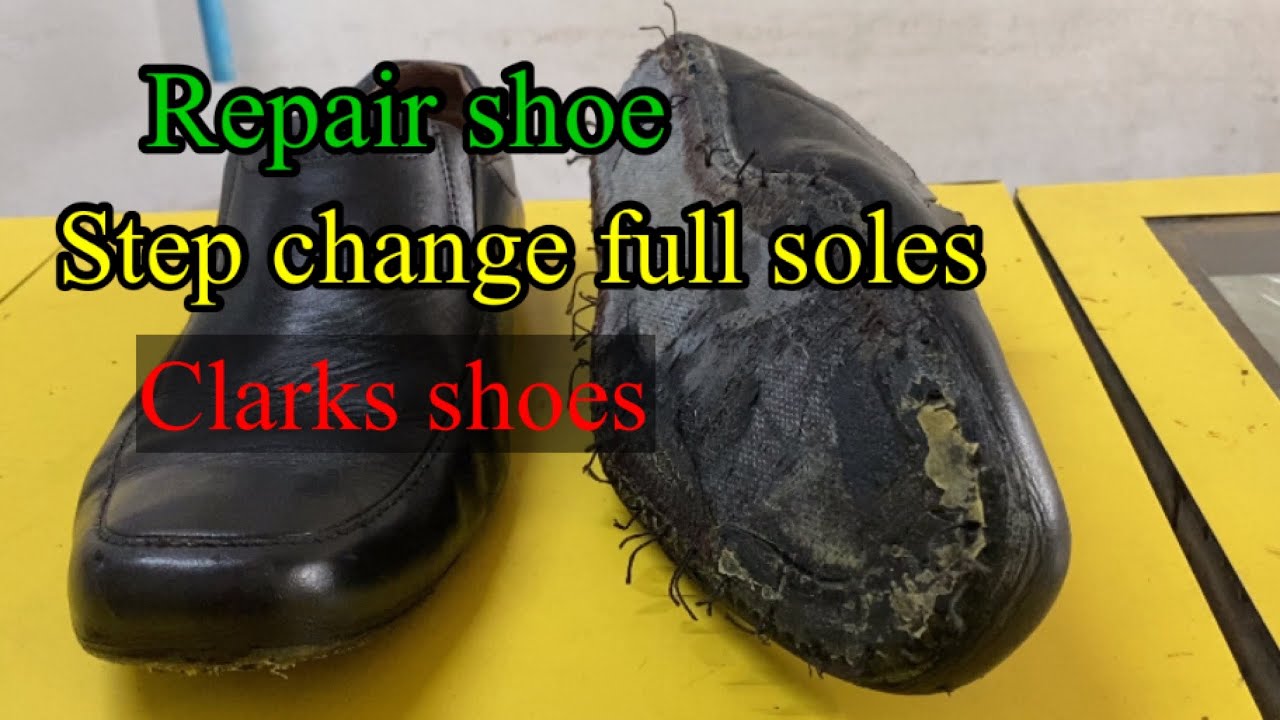
How to Glue Sole Back on Boot of Clarks Shoe?
If you’re wondering how to glue the sole back on a boot of Clarks shoe, here’s a step-by-step tutorial:
- Clean the sole and the boot surface thoroughly with a shoe cleaner or rubbing alcohol.
- Apply a generous amount of shoe adhesive to both the sole and boot surface.
- Press the sole firmly onto the boot, ensuring proper alignment.
- Use clamps or heavy objects to apply pressure on the glued area and let it dry for the recommended time.
- Once the adhesive is fully dry, remove the clamps and test the bond before wearing the boots again.
By following these steps, you can easily glue the sole back on your Clarks shoe and restore its functionality. Happy repairing!
How to Glue Sole Back on Boot of Clarks Shoe?
Clarks shoes are known for their durability and quality. However, over time, the sole of a shoe may start to come loose or detach. This can be frustrating, especially if you love your Clarks boots. The good news is that you can easily fix this issue by gluing the sole back on. In this article, we will guide you through the process of gluing the sole back on a Clarks boot, ensuring that it stays in place and extends the life of your beloved footwear.
Why Does the Sole of a Shoe Come Loose?
There are a few reasons why the sole of a shoe, including Clarks boots, may come loose. One common reason is wear and tear. Over time, the adhesive used to attach the sole to the shoe may weaken, causing it to come loose. Additionally, exposure to moisture or extreme temperatures can also weaken the adhesive, leading to sole detachment. Finally, if you frequently put stress on the sole, such as by walking on rough terrains or engaging in intense physical activities, it can cause the sole to come loose.
The Importance of Fixing a Loose Sole
Fixing a loose sole is essential for several reasons. Firstly, it ensures that your shoe remains comfortable and supportive. A loose sole can lead to discomfort, instability, and even foot pain. By regluing the sole back on, you can restore the original fit and feel of your Clarks boots.
Secondly, fixing a loose sole can save you money. Buying a new pair of shoes can be costly, especially if you invested in a high-quality brand like Clarks. By repairing the sole, you can extend the life of your boots and avoid the need for a replacement.
How to Glue the Sole Back on a Clarks Boot
Now that we understand why the sole might come loose and the importance of fixing it, let’s dive into the step-by-step process of gluing the sole back on a Clarks boot.
Step 1: Clean the Sole and Shoe
Before applying any adhesive, it’s crucial to clean the sole and the shoe’s surface thoroughly. Use a mild soap or detergent and warm water to remove any dirt, dust, or debris. This step ensures that the adhesive can bond properly and provides a stronger connection between the sole and the shoe.
Step 2: Choose the Right Adhesive
Selecting the right adhesive is crucial for a successful sole repair. Look for a strong adhesive that is specifically designed for shoe repair. Epoxy or polyurethane-based adhesives are often recommended for this purpose. These adhesives provide excellent bonding capabilities and are resistant to moisture, heat, and other environmental factors.
Step 3: Apply the Adhesive
Using a small brush or applicator, apply the adhesive to both the cleaned sole and the shoe’s surface. Ensure that you apply a thin, even layer of adhesive to maximize bonding. Avoid applying too much adhesive, as it can lead to excess glue seeping out when pressure is applied.
Step 4: Press and Secure
After applying the adhesive, carefully align the sole with the shoe’s surface and press them firmly together. Apply even pressure across the entire sole to ensure a strong bond. You can use clamps or heavy objects to secure the sole in place while the adhesive cures. Follow the manufacturer’s instructions for the recommended curing time.
Step 5: Allow Proper Drying Time
After securing the sole, allow sufficient time for the adhesive to dry and cure. This typically takes a few hours, but it’s best to refer to the instructions provided with the adhesive for accurate drying time. Avoid wearing the shoes until the adhesive has fully cured to ensure a long-lasting bond.
Tips for a Successful Sole Repair
To ensure a successful sole repair and maximize the longevity of your Clarks boots, consider the following tips:
1. Clean the sole and shoe surface thoroughly to remove any dirt or debris that may hinder the adhesive’s bonding capabilities.
2. Choose a high-quality adhesive specifically designed for shoe repair.
3. Apply a thin, even layer of adhesive to both the sole and the shoe’s surface for optimal bonding.
4. Press and secure the sole firmly in place, applying even pressure across the entire surface.
5. Allow sufficient drying time for the adhesive to cure before wearing the shoes.
By following these tips, you can effectively glue the sole back on your Clarks boots, ensuring a secure and long-lasting bond.
In Conclusion
Repairing a loose sole on your Clarks boots is a simple task that can save you money and extend the life of your favorite footwear. By following the step-by-step process outlined in this article and using the right adhesive, you can easily fix a loose sole and restore the comfort and support of your Clarks shoes. Remember to clean the sole and shoe surface, choose a high-quality adhesive, apply it evenly, and allow sufficient drying time for the best results. With a little effort, your Clarks boots will be back to their original glory and ready to take on any adventure.
Key Takeaways: How to Glue Sole Back on Boot of Clarks Shoe?
- Make sure to clean the sole and boot surface before gluing them together.
- Apply a strong adhesive specifically designed for shoe repairs.
- Press the sole firmly onto the boot and hold it in place for a few minutes.
- Allow the glue to dry completely before wearing the shoe.
- Consider reinforcing the bond with additional stitching for extra durability.
Frequently Asked Questions
Q: Is it possible to glue the sole back on a Clarks boot?
A: Yes, it is possible to glue the sole back on a Clarks boot. With the right adhesive and proper technique, you can successfully repair your boots and extend their lifespan.
First, you will need to gather the necessary materials, including a high-quality shoe glue specifically designed for bonding rubber or leather. Clean the sole and the area where it detached from the boot to ensure a strong bond. Apply a thin and even layer of glue to both surfaces, then press them firmly together. Use clamps or heavy objects to keep the sole in place while the glue dries. Allow the glue to cure for the recommended time before wearing the boots again.
Q: What type of glue should I use to repair the sole of my Clarks boot?
A: To repair the sole of your Clarks boot, it is best to use a shoe glue that is specifically designed for bonding rubber or leather. Look for a high-quality adhesive that is strong, flexible, and waterproof. Brands such as Shoe Goo, Barge, and E6000 are often recommended for this type of repair.
Before applying the glue, make sure to clean the sole and the area where it detached from the boot. This will ensure a clean and strong bond. Follow the instructions provided by the glue manufacturer for the best results. Allow the glue to fully cure before wearing the boots again.
Q: Can I use super glue to fix the sole of my Clarks boot?
A: While super glue may seem like a quick and easy fix for a detached sole, it is not the best choice for repairing Clarks boots or any other footwear. Super glue is not designed for bonding materials like rubber or leather, and it may not provide a strong and lasting bond.
It is recommended to use a shoe glue that is specifically designed for this purpose. These adhesives are formulated to withstand the stress and movement that shoes endure, ensuring a reliable and durable repair. Using the appropriate glue will help extend the life of your Clarks boots and prevent further damage.
Q: How long does it take for the glue to dry when repairing the sole of a Clarks boot?
A: The drying time of the glue used to repair the sole of a Clarks boot can vary depending on the brand and type of adhesive used. It is important to follow the instructions provided by the glue manufacturer for the best results.
In general, most shoe glues require at least 24 hours to fully cure and bond the materials together. However, some adhesives may dry faster or slower, so be sure to check the specific drying time mentioned on the glue packaging. It is essential to allow the glue to fully dry and cure before wearing the boots to ensure a strong and lasting repair.
Q: Can I repair the sole of my Clarks boot myself, or should I take it to a professional?
A: Repairing the sole of your Clarks boot can be done yourself if you have the right materials and follow the proper technique. With the right adhesive and careful application, you can successfully repair the sole and save money on professional repairs.
If you are confident in your DIY skills and have experience with similar repairs, you can attempt to fix the sole yourself. However, if you are unsure or uncomfortable with the process, it is recommended to take your boots to a professional cobbler or shoe repair shop. They have the expertise and tools to ensure a high-quality repair that will extend the life of your Clarks boots.
Final Thoughts
So there you have it, my friends! We’ve reached the end of our journey on how to glue the sole back on a boot of Clarks shoe. It’s been quite an adventure, hasn’t it? We’ve learned some valuable tips and tricks along the way, and now you’re armed with the knowledge to tackle this DIY project with confidence.
Remember, when it comes to repairing your favorite pair of boots, it’s essential to choose the right adhesive and follow the correct procedure. Make sure to clean the surfaces thoroughly, apply the glue evenly, and allow it to dry and cure properly. Patience is key in this process, my friends. Rome wasn’t built in a day, and neither is a perfectly repaired boot!
Now, go forth and revive those beloved Clarks shoes of yours. Whether you’re hitting the streets or strutting your stuff on the dance floor, you’ll be doing it with style and confidence, knowing that your soles are securely glued back in place. Happy repairing, my dear shoe enthusiasts!
Final Summary
And that’s a wrap, folks! We’ve reached the end of our guide on how to glue the sole back on a boot of Clarks shoe. We’ve covered the step-by-step process, from gathering the necessary materials to applying the glue and allowing it to dry. By following these instructions, you can restore your favorite footwear to its former glory.
Remember, when it comes to repairing your Clarks shoes, patience and precision are key. Take your time, ensure that the surfaces are clean and dry, and apply the adhesive evenly. Don’t rush the process, my friends, because a well-repaired sole will provide you with many more comfortable and stylish steps to come.
So, go ahead and put your newfound knowledge into action. Show those worn-out soles who’s boss and give your Clarks shoes a second chance to shine. Your feet will thank you, and you’ll be striding confidently in no time!