
If you’ve ever wanted to add a little extra flair to your shoes, then you’re in for a treat! In this article, we will dive into the exciting world of Heely wheels and learn how to install them. These wheels can transform your regular shoes into a fun and stylish mode of transportation. So, get ready to roll and let’s find out how to install Heely wheels!
Installing Heely wheels is a simple process that can be done in just a few steps. First, make sure you have all the necessary tools and equipment. You’ll need a screwdriver, the Heely wheels kit, and of course, a pair of shoes that are compatible with the wheels. Once you have everything ready, it’s time to get started. In the next section, we will walk you through the step-by-step process of installing Heely wheels and get you rolling in no time. So, put on your DIY hat and let’s get started!
Installing Heely wheels is a breeze with these simple steps:
- Remove the existing wheels from your Heelys by using a wrench to loosen the axle nuts.
- Insert the new Heely wheels into the wheel wells, ensuring that they fit snugly.
- Tighten the axle nuts securely using the wrench.
- Repeat the process for all wheels.
Enjoy a smooth ride with your newly installed Heely wheels!
How to Install Heely Wheels?
Heely wheels are a popular accessory for shoes, allowing you to transform your regular footwear into a fun and exciting way to get around. Whether you’re a beginner or an experienced Heely rider, installing the wheels correctly is crucial for safety and optimal performance. In this article, we will guide you through the step-by-step process of installing Heely wheels, ensuring that you can enjoy the thrill of gliding effortlessly.
Step 1: Gather the Necessary Materials
Before you begin installing Heely wheels, make sure you have all the required materials on hand. You will need a pair of Heelys with removable wheels, the Heely wheel kit, a wrench, and a flathead screwdriver. It’s important to use genuine Heelys and the official wheel kit to ensure compatibility and safety. Once you have everything ready, you’re all set to move on to the next step.
Step 1.1: Check the Compatibility
Before proceeding with the installation, it’s crucial to check the compatibility of the Heely wheels with your shoes. Different shoe models may require specific types of wheels, so refer to the instructions provided with your wheel kit. Ensure that the wheels are designed to fit your Heelys properly to avoid any complications during the installation process.
Step 1.2: Choose the Wheel Configuration
The Heely wheel kit typically includes two wheels, allowing you to choose between single-wheel or double-wheel configurations. Single-wheel configurations are recommended for beginners as they provide better stability and control, while double-wheel configurations offer more advanced tricks and maneuvers. Consider your skill level and preference when selecting the wheel configuration for your Heelys.
Step 2: Remove Existing Plugs or Wheels
If your Heelys already have plugs or wheels in place, you’ll need to remove them before installing the new wheels. Use a flathead screwdriver to carefully pry out the plugs or wheels from the designated slots. Take your time and ensure that you don’t damage the shoe or any surrounding parts during this process. Once the plugs or wheels are removed, you’re ready to proceed to the next step.
Step 2.1: Inspect the Shoe Surface
After removing the plugs or wheels, inspect the shoe surface to ensure it is clean and free from any debris or obstructions. Wipe the area with a cloth or brush to remove any dirt or dust particles. This will provide a smooth and secure surface for attaching the new Heely wheels.
Step 2.2: Store Plugs or Wheels Safely
If you have removed plugs or wheels from your Heelys, make sure to store them in a safe place. You may need them in the future if you decide to switch back to the original configuration or replace the wheels. Keeping them in a labeled container or bag will prevent them from getting lost or damaged.
Step 3: Install the New Heely Wheels
Now that you have prepared your Heelys and gathered the necessary materials, it’s time to install the new wheels. Follow these steps to ensure a proper installation:
1. Insert the Heely wheel into the designated slot on the shoe. Make sure it fits securely and aligns with the holes on the wheel.
2. Use a wrench to tighten the wheel nut onto the axle, ensuring that it is snug but not overly tight. This will prevent the wheel from wobbling or coming loose during use.
3. Repeat the process for the second wheel, if applicable, ensuring that both wheels are installed symmetrically for balanced performance.
4. Test the wheels by gently rolling them on a flat, smooth surface. Ensure that they rotate freely and smoothly without any obstructions or resistance.
Step 3.1: Adjust the Wheel Position
If the wheels don’t align properly or feel uneven, you may need to adjust their position. Loosen the wheel nut slightly and reposition the wheel until it sits straight and aligned with the shoe. Once adjusted, tighten the wheel nut securely to maintain the desired position.
Step 3.2: Check Wheel Stability
After installing the new Heely wheels, it’s essential to check their stability before using them. Gently rock the shoe back and forth to ensure that the wheels are securely attached and properly aligned. If you notice any wobbling or instability, double-check the installation and tighten the wheel nuts as necessary.
Step 4: Practice and Enjoy
With your Heely wheels successfully installed, it’s time to practice and enjoy the exhilarating experience of gliding on wheels. Start in a safe and open area, such as a smooth pavement or skate park, to get comfortable with the wheels. Begin with small glides and gradually increase your speed and confidence. Remember to follow all safety guidelines and wear protective gear, including a helmet, knee pads, and elbow pads.
Step 4.1: Learn Basic Heely Techniques
As a beginner, it’s important to learn the basic Heely techniques to ensure a safe and enjoyable ride. Practice maintaining your balance, rolling, and stopping smoothly. Once you feel comfortable, you can progress to more advanced tricks and maneuvers, such as turning, jumping, and grinding. Take your time and always prioritize safety while exploring the possibilities of Heely riding.
Step 4.2: Maintain Your Heely Wheels
To ensure optimal performance and longevity of your Heely wheels, it’s crucial to maintain them regularly. Clean the wheels and bearings periodically to remove dirt and debris that may affect their smoothness. Check for any signs of wear or damage and replace any worn-out parts promptly. By taking care of your Heely wheels, you can enjoy many hours of fun and excitement.
Remember, installing Heely wheels requires precision and attention to detail. Follow the instructions provided with your Heelys and wheel kit carefully to ensure a successful installation. With proper installation and practice, you’ll be gliding and performing impressive Heely tricks in no time. Enjoy the ride!
Key Takeaways: How to Install Heely Wheels?
- Make sure you have the right size of Heely wheels for your shoes.
- Remove the old wheels by unscrewing them carefully.
- Insert the new wheels into the wheel slots and tighten the screws.
- Check that the wheels are securely attached and spin freely.
- Practice using your Heelys in a safe and open area to get comfortable.
Frequently Asked Questions
How do I install Heely Wheels?
Installing Heely Wheels is a relatively simple process. Here’s a step-by-step guide on how to do it:
1. Start by removing the original wheels from your Heelys. Use a screwdriver or a wrench to unscrew the bolts holding the wheels in place.
2. Once the old wheels are removed, take the new Heely Wheels and align them with the holes on the bottom of your Heely shoes.
3. Insert the bolts through the holes on the wheels and into the corresponding holes on the shoes. Use a screwdriver or a wrench to tighten the bolts securely.
4. Repeat the process for all the wheels, making sure they are all securely fastened.
5. Once all the wheels are installed, give them a test spin to ensure they are rolling smoothly.
With these easy steps, you’ll have your Heely Wheels installed and ready to roll in no time!
Can I install Heely Wheels on any type of shoes?
No, Heely Wheels are designed specifically for Heely shoes. They are not compatible with other types of shoes. Heely shoes have a unique design that allows for the installation of wheels on the bottom. Attempting to install Heely Wheels on other types of shoes may not only damage the shoes but also compromise safety and performance. It’s important to use Heely Wheels only with Heely shoes to ensure proper fit and functionality.
Do I need any special tools to install Heely Wheels?
Installing Heely Wheels does not require any special tools. However, you will need a screwdriver or a wrench to remove the old wheels and install the new ones. Make sure you have the appropriate size of screwdriver or wrench that fits the bolts on your Heely shoes. Having the right tools will make the installation process easier and ensure a secure fit for the wheels.
If you don’t have the necessary tools, you can easily find them at a local hardware store or purchase them online. It’s always a good idea to have the right tools on hand for any future maintenance or adjustments to your Heely shoes.
Are there any safety precautions to consider when installing Heely Wheels?
While installing Heely Wheels is generally safe, it’s important to take certain precautions to ensure your safety:
1. Always read and follow the manufacturer’s instructions for installing the wheels. This will provide you with specific guidelines and safety recommendations.
2. Make sure the shoes are on a stable surface when installing the wheels to prevent them from slipping or tipping over.
3. Double-check the tightness of the bolts after installation to ensure the wheels are securely fastened. Loose bolts can cause the wheels to detach while skating.
4. Start with a slow and controlled pace when you first use your Heelys with the new wheels. This will allow you to get comfortable and adjust to the new wheels’ speed and maneuverability.
By following these safety precautions, you can enjoy a fun and safe experience with your Heely Wheels.
Can I remove Heely Wheels once they are installed?
Yes, Heely Wheels can be removed from your Heely shoes if desired. To remove the wheels, simply follow the same steps as installation, but in reverse:
1. Use a screwdriver or a wrench to unscrew the bolts holding the wheels in place.
2. Once the bolts are removed, carefully take out the wheels from the holes on the bottom of your Heely shoes.
3. If you plan on reinstalling the wheels in the future, keep the bolts and wheels in a safe place.
Remember that removing the Heely Wheels will turn your Heely shoes back into regular shoes, so you won’t be able to skate with them anymore. If you want to use the wheels again, simply follow the installation process described earlier.
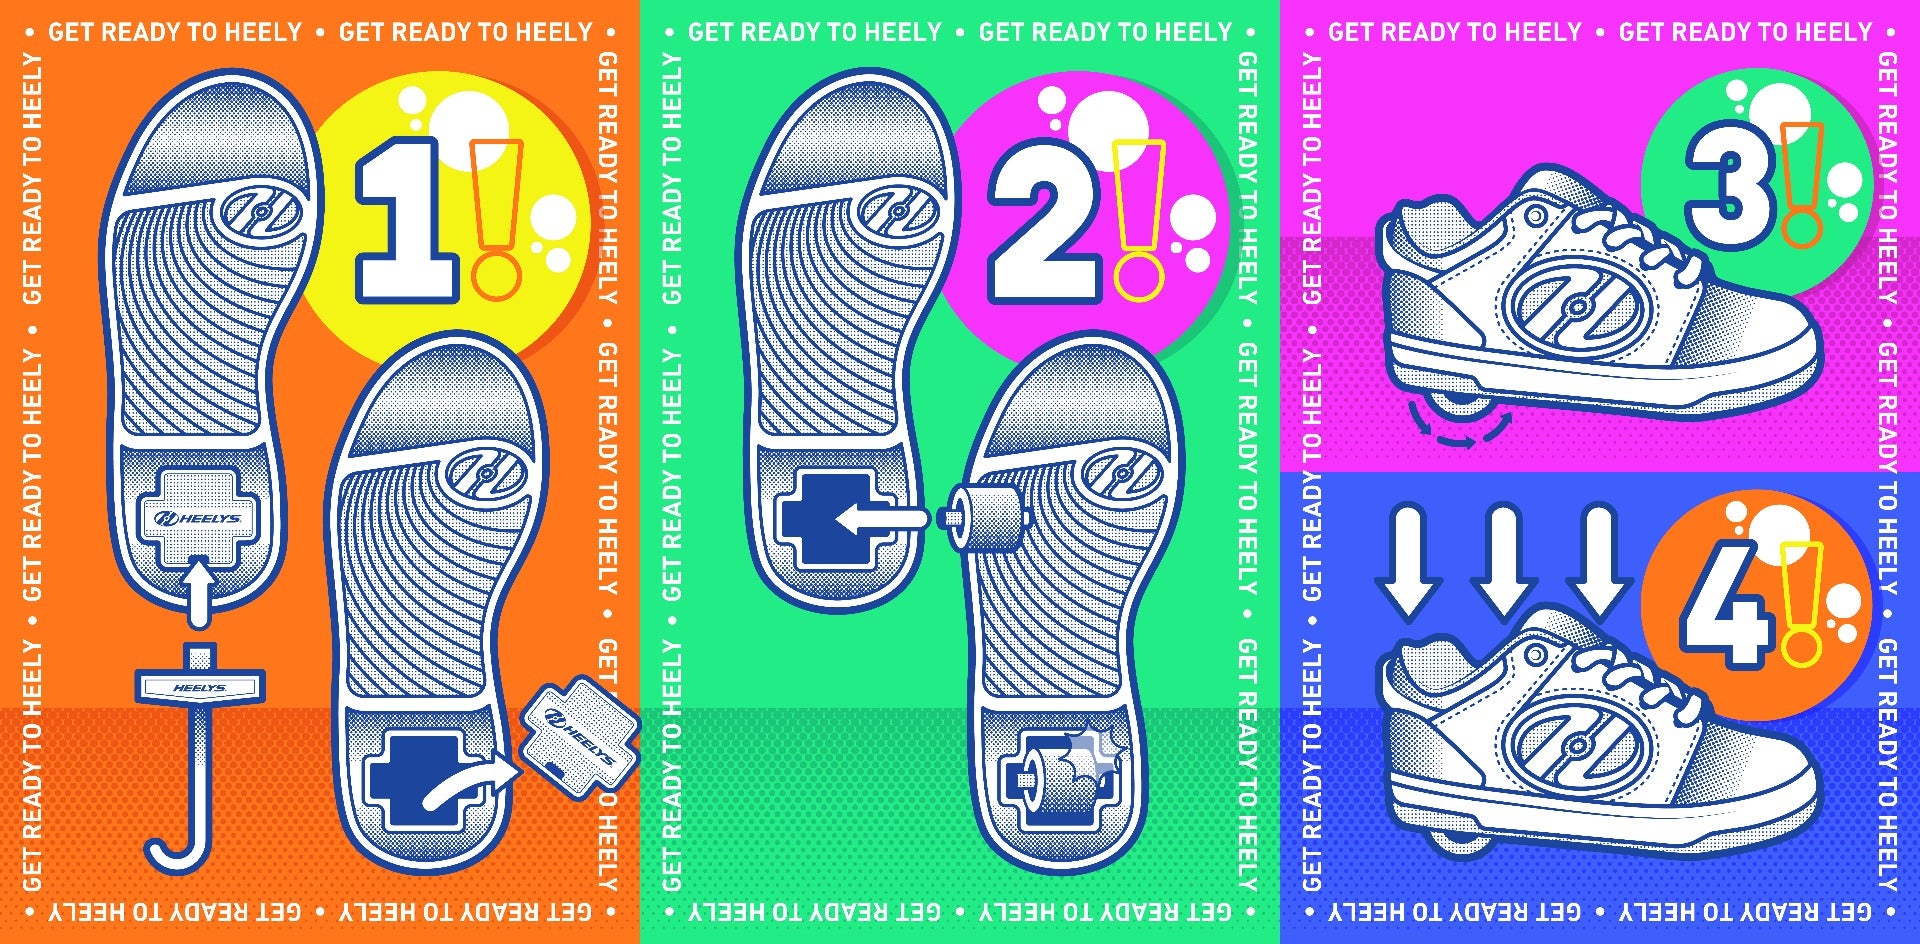
HOW TO INSTALL & REMOVE HEELYS WHEELS
Final Thoughts
So there you have it, folks! Installing Heely wheels is as easy as pie, and before you know it, you’ll be gliding around like a pro. Just follow these simple steps, and you’ll be rolling in no time.
Remember to start by removing the stock wheels from your shoes using the provided tool. Then, insert the Heely wheels into the empty slots, making sure they’re secure and properly aligned. Tighten the axle nuts, but be careful not to overtighten them. Finally, give your new wheels a test run and enjoy the thrill of Heely-ing to your heart’s content.
Installing Heely wheels not only adds a fun and unique element to your shoes, but it also allows you to explore the world in a whole new way. Whether you’re cruising through the park or zipping down the sidewalk, Heely-ing is sure to bring a smile to your face and make every journey an adventure.
So go ahead, grab a pair of Heelys, and get ready to roll into a world of excitement. With these simple installation steps, you’ll be well on your way to experiencing the joy and freedom that Heelys have to offer. Happy Heely-ing!