
Hey there, folks! Ready to roll into some fun? Well, if you’ve got a pair of Heelys and you’re wondering how to put those wheels in, you’ve come to the right place! In this article, we’re going to dive into the exhilarating world of Heelys and show you the ropes on how to get those wheels spinning smoothly. So, tighten up your laces and let’s get rolling!
Now, I know you might be thinking, “How hard can it be to put wheels in a pair of shoes?” Well, fear not, my friend, because we’re here to guide you every step of the way. Whether you’re a seasoned Heelys pro or a newbie just getting started, we’ve got the tips and tricks you need to make sure those wheels are in securely and ready to propel you on your next adventure. So, grab your toolbox and let’s dive into the world of Heelys!
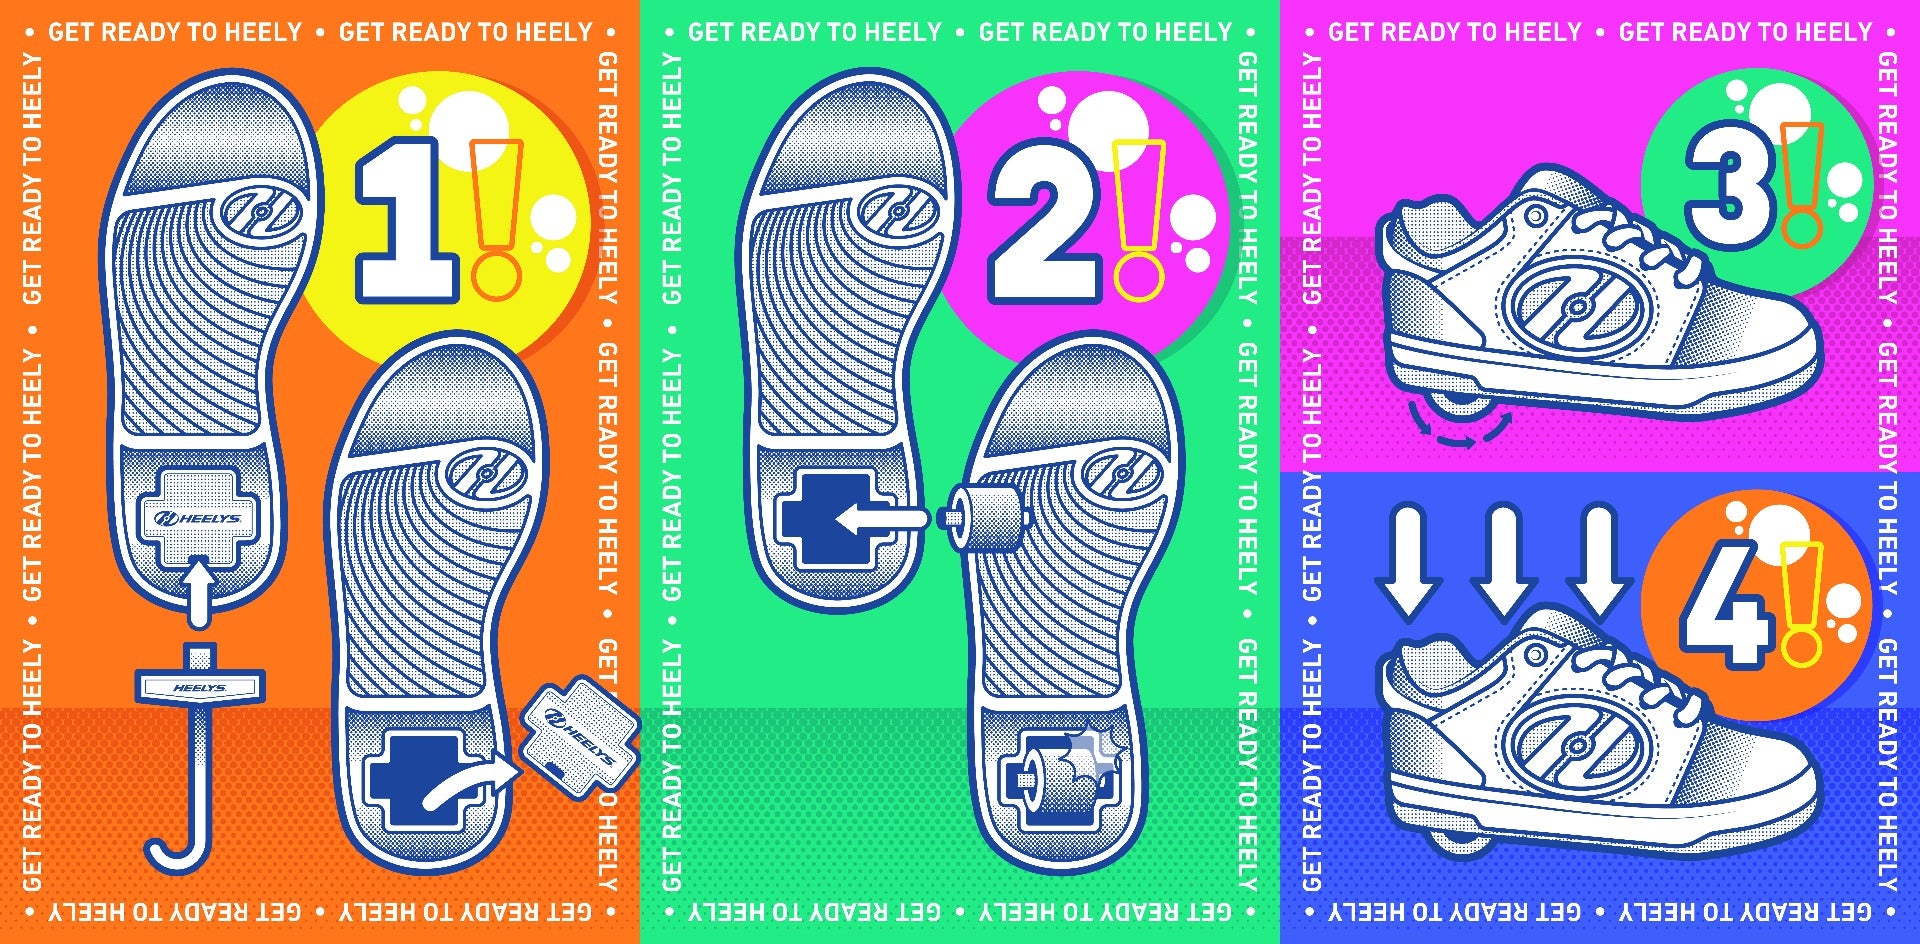
How to Put Heely Wheels In
Putting Heely wheels in your shoes is a fun and exciting way to add a new element to your footwear. Follow these step-by-step instructions to get rolling:
- Remove the existing shoe sole to create space for the wheels.
- Insert the Heely wheel brackets into the designated slots on the shoe.
- Secure the brackets in place using the provided screws.
- Attach the wheels onto the brackets, ensuring they are properly aligned.
- Tighten the wheel nuts to secure the wheels in position.
With your Heely wheels securely installed, you’re ready to glide through the streets with style and ease!
How to Put Heely Wheels In: Step-by-Step Guide
Heelys are a popular type of shoe that comes with removable wheels in the heel, allowing wearers to glide smoothly and effortlessly. If you’ve recently purchased a pair of Heelys or want to replace your old wheels, you may be wondering how to put Heely wheels in. Luckily, the process is relatively simple and can be done at home with a few basic tools. In this article, we will provide you with a step-by-step guide on how to put Heely wheels in, so you can start rolling in no time.
Step 1: Gather Your Tools
Before you begin, make sure you have all the necessary tools and equipment. You will need a screwdriver, preferably a Phillips-head screwdriver, to remove the screws holding the old wheels in place. Additionally, you may also need a pair of pliers to help you remove stubborn screws. Having these tools on hand will make the process much easier and more efficient.
Once you have your tools ready, you can move on to the next step.
Step 2: Remove the Old Wheels
The next step is to remove the old wheels from your Heelys. Start by flipping the shoe upside down, so the sole is facing up. Locate the screws that are holding the wheels in place. Depending on the model of your Heelys, there may be two or more screws per wheel.
Using your screwdriver, carefully unscrew each screw and set them aside. Be sure to keep track of the screws, as you will need them later to attach the new wheels. Once all the screws are removed, gently pull the old wheels out of the sole. If the wheels are stuck, you can use a pair of pliers to help loosen them.
Pro Tip: Lubricate Stuck Wheels
If the old wheels are difficult to remove, try applying a small amount of lubricant, such as WD-40, to the wheel axle. This will help loosen any rust or debris that may be causing the wheels to stick. Allow the lubricant to sit for a few minutes before attempting to remove the wheels again.
Once you have successfully removed the old wheels, you can proceed to the next step.
Step 3: Insert the New Wheels
Now that you have removed the old wheels, it’s time to insert the new ones. Take your new Heely wheels and align them with the holes in the sole of your shoe. Make sure the wheel axles are lined up properly and slide the wheels into place. You should feel a slight click or snap when the wheels are securely inserted.
Once the new wheels are in place, it’s time to attach them using the screws you removed earlier.
Step 4: Secure the New Wheels
With the new wheels in position, it’s time to secure them in place. Take the screws you set aside earlier and carefully insert them into the holes on the sole, aligning them with the holes on the wheels. Use your screwdriver to tighten the screws, but be careful not to overtighten, as this can damage the shoe or strip the screws.
Repeat this process for each wheel until all the new wheels are securely attached.
Pro Tip: Check Wheel Alignment
Before you finish, take a moment to ensure that all the wheels are properly aligned and spinning freely. Give each wheel a gentle spin and check for any wobbling or resistance. If you notice any issues, double-check the alignment and tighten the screws as needed.
Once you are satisfied with the alignment and secure attachment of the new wheels, your Heelys are ready to roll!
Putting Heely wheels in is a straightforward process that can be done at home with minimal tools. By following this step-by-step guide, you can easily replace your old wheels and get back to enjoying the thrill of gliding on your Heelys. Remember to always wear protective gear and practice in a safe, open area to ensure a fun and safe Heely experience. Happy rolling!
Key Takeaways: How to Put Heely Wheels In?
- Make sure you have the right tools, including a wrench and screwdriver.
- Remove the old wheels by unscrewing them from the Heely shoes.
- Insert the new Heely wheels into the empty slots and tighten them securely.
- Check that the wheels rotate freely and are properly aligned.
- Practice skating with your new Heely wheels in a safe and open area.
Frequently Asked Questions
Can anyone put Heely wheels in their shoes?
Yes, anyone can put Heely wheels in their shoes as long as their shoes are compatible with the Heely wheel system. Most Heelys are designed to fit in regular athletic shoes, so make sure you have a pair of shoes that can accommodate the wheels.
It’s important to note that Heelys are not recommended for very young children or individuals with balance or mobility issues. Always use caution and assess your own ability to handle the wheels before attempting to put them in your shoes.
What tools do I need to put Heely wheels in?
To put Heely wheels in your shoes, you will need a few basic tools. Firstly, you will need a screwdriver or Allen wrench, depending on the type of Heelys you have. Most Heelys come with a specific tool for removing and installing the wheels.
Additionally, having a pair of pliers can be helpful for tightening the wheel axle securely. It’s always a good idea to have a clean, flat surface to work on, such as a table or bench, to prevent any small parts from getting lost during the process.
How do I remove the existing wheels from my Heelys?
To remove the existing wheels from your Heelys, locate the wheel axle on the bottom of the shoe. Use the appropriate tool, such as a screwdriver or Allen wrench, to unscrew the axle in a counterclockwise motion.
Once the axle is loose, carefully pull the wheel out from the bottom of the shoe. Repeat this process for all the wheels you wish to remove. Make sure to keep track of any washers or spacers that may be attached to the axle during the removal process.
How do I install Heely wheels in my shoes?
Installing Heely wheels in your shoes is a relatively simple process. Start by preparing the wheels by ensuring they are clean and free from any dirt or debris. Then, insert the wheel axle through the designated hole in the bottom of the shoe.
Use the appropriate tool to tighten the axle in a clockwise motion, ensuring it is securely fastened. Give the wheel a gentle tug to ensure it is properly installed and won’t come loose during use. Repeat this process for all the wheels you want to install.
Are there any safety precautions I should take when using Heelys?
Yes, there are several safety precautions you should take when using Heelys. Firstly, always wear protective gear such as a helmet, knee pads, and elbow pads. This will help protect you from injury in case of a fall.
It’s also important to practice in a safe and controlled environment, away from traffic or other hazards. Start by getting comfortable with walking and gliding before attempting any tricks or higher speeds. Lastly, always be mindful of your surroundings and avoid using Heelys on slippery or uneven surfaces.
Final Summary: Get Rolling with Heely Wheels!
So there you have it, folks! You’re now equipped with all the knowledge and know-how on how to put Heely wheels in. It’s time to unleash your inner roller-skater and experience the thrill of gliding effortlessly through the streets. Just remember, safety first! Always wear protective gear and find a suitable and smooth surface to practice on.
Now, let’s quickly recap the steps we’ve covered. First, gather all the necessary tools and equipment, including the Heely wheels, a wrench, and a screwdriver. Then, remove the existing wheels from your shoes by unscrewing them. Next, insert the Heely wheels into the empty slots and secure them tightly using the provided screws. Finally, give them a test run and enjoy the exhilarating sensation of skating with Heelys!
By following these simple instructions, you’ll be well on your way to mastering the art of Heelys. Whether you’re a beginner or an experienced skater, these wheels will surely add an extra element of fun to your daily adventures. So go out there, rock those Heelys, and let the good times roll!
Remember, the key to success is practice and perseverance. As you continue to hone your skills, you’ll be able to perform cool tricks and impress your friends with your Heely prowess. So don’t be afraid to push yourself and embrace the learning process. Before you know it, you’ll be gliding through life with style and confidence.
So what are you waiting for? Grab your Heelys, put those wheels in, and let the adventures begin! Happy rolling!