
So, you’ve got yourself a brand new pair of Heelys and you’re ready to roll! But there’s just one problem – you need to figure out how to put the wheels on. Don’t worry, my friend, I’ve got you covered. In this article, we’re going to dive into the step-by-step process of how to put wheels on Heelys, so you’ll be gliding around in no time.
Now, I know you’re eager to get started, but before we jump right in, let’s take a moment to appreciate the sheer genius of Heelys. These shoes combine the best of both worlds – the sleekness of sneakers and the thrill of roller skating. It’s like having your own personal roller rink on your feet! But enough talk, let’s get down to business and learn how to put those wheels on.
First things first, make sure you have all the necessary tools at hand. You’ll need a skate tool, which is a handy little gadget that’s specifically designed for working on skateboards and roller skates. If you don’t have one, don’t fret – you can easily find them online or at your local skate shop. Trust me, it’s worth the investment.
Now that you’ve got your skate tool ready, it’s time to start the wheel installation process. Find the pre-drilled holes on the bottom of your Heelys and align them with the holes on your wheels. Insert the axle into the holes, making sure it goes through both the shoe and the wheel. Once the axle is in place, use your skate tool to tighten the nuts on the other side of the wheel. Make sure they’re nice and snug, but not too tight – you want the wheel to spin freely.
Repeat this process for all the wheels, making sure they’re evenly spaced and aligned. And voila! You’ve successfully put the wheels on your Heelys. Now all that’s left to do is lace up your shoes, step onto a smooth surface, and let the good times roll.
So, there you have it – a simple and straightforward guide on how to put wheels on Heelys. It may seem a bit daunting at first, but trust me, it’s a lot easier than it looks. Just take your time, follow the steps, and soon enough, you’ll be gliding around like a pro. Now go out there and show off your new moves!
How to Put Wheels on Heelys?
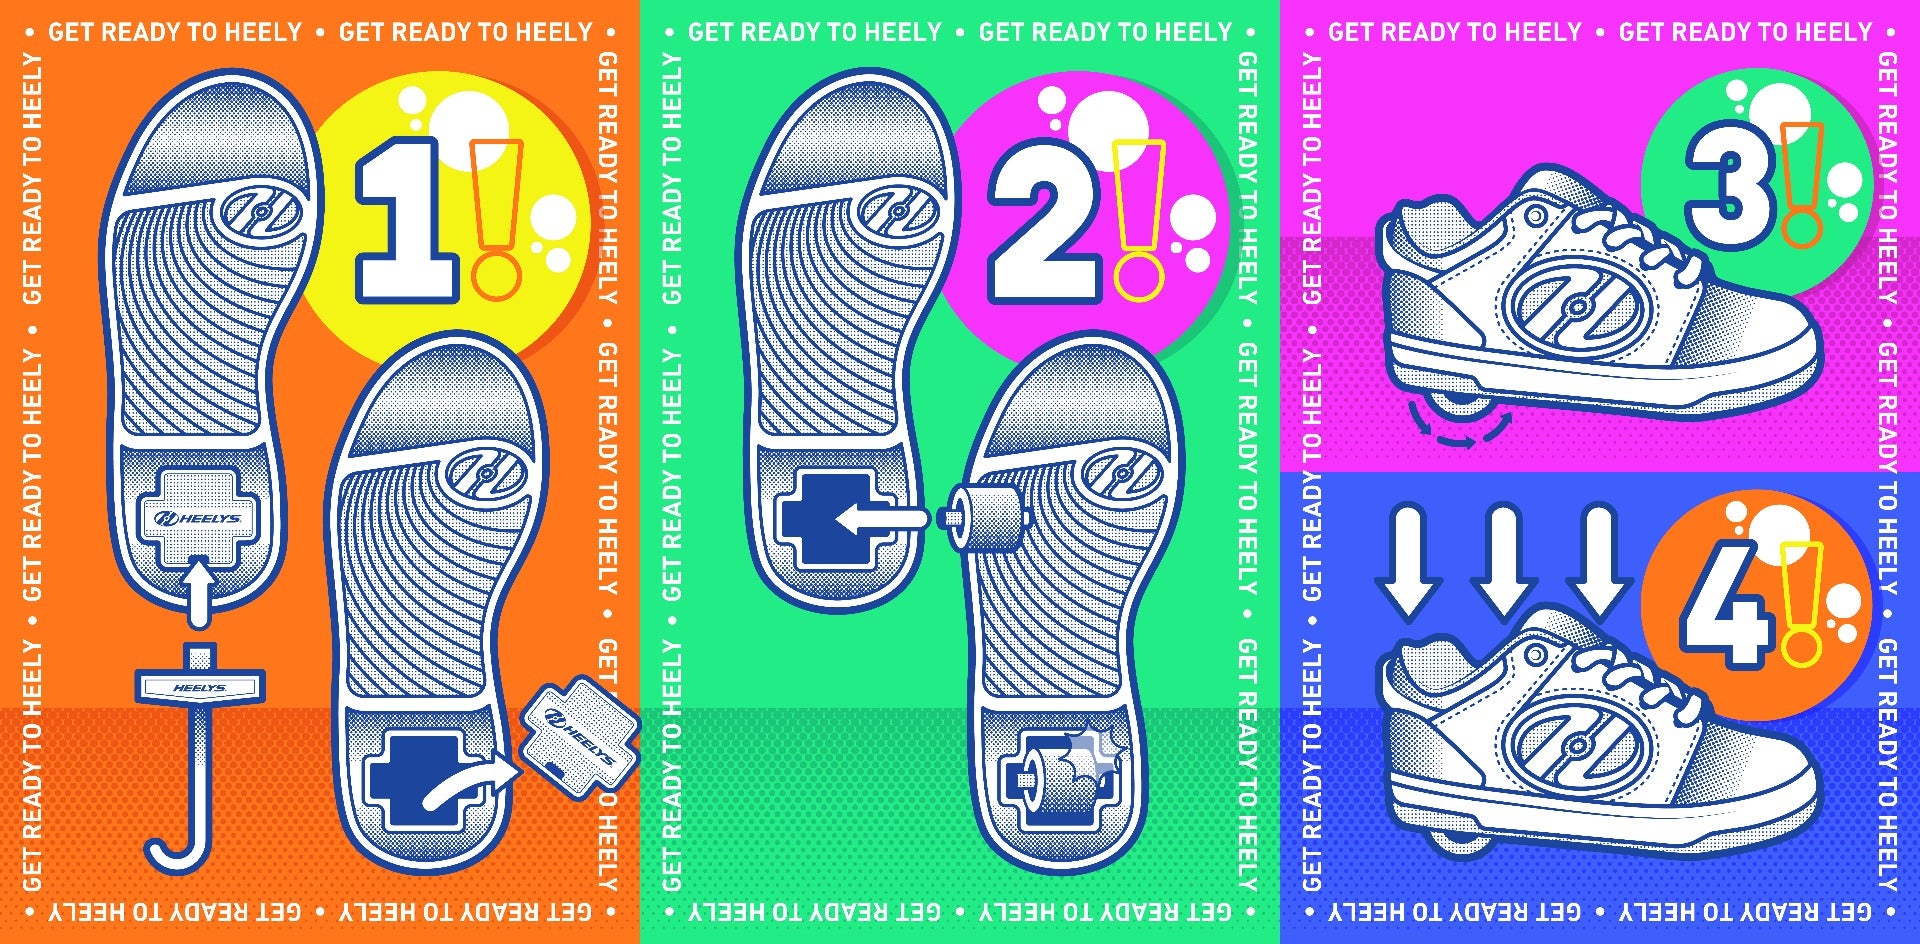
- Remove the existing wheel plugs from your Heelys shoes.
- Insert the wheels into the empty wheel sockets, making sure they are securely in place.
- Tighten the axle nuts using a wrench to ensure the wheels are firmly attached.
- Repeat the process for all wheels on both shoes.
- Test the wheels to ensure they spin freely and are properly aligned.
By following these steps, you can easily put wheels on your Heelys and enjoy rolling around with ease!
How to Put Wheels on Heelys?
Heelys are a popular type of footwear that combines the functionality of a sneaker with the fun of roller skates. They have a removable wheel in the heel, allowing wearers to glide and roll. If you’re new to Heelys or just need to replace the wheels, you may be wondering how to put wheels on Heelys. Luckily, the process is straightforward and can be done at home with a few simple steps. In this article, we will guide you through the process of putting wheels on Heelys, ensuring that you can enjoy gliding and rolling in no time.
Step 1: Gather Your Materials
Before you begin, make sure you have all the necessary materials. You will need a set of replacement Heelys wheels, a small wrench or Allen key, and a flat surface to work on. It’s essential to use genuine Heelys wheels to ensure proper fit and performance.
Step 1.1: Choosing the Right Wheels
When selecting replacement wheels for your Heelys, consider factors such as hardness, diameter, and color. Hardness refers to the durometer rating of the wheel, with higher numbers indicating a harder wheel. Softer wheels provide better grip but may wear down more quickly. Diameter determines the wheel’s height, with larger wheels typically offering more stability. Finally, choose a color that suits your style and preferences.
Step 1.2: Safety Precautions
Before you start working on your Heelys, it’s crucial to take some safety precautions. Find a well-lit area with plenty of space to move around. Ensure that the floor is clean and free of any debris that could cause accidents. Additionally, consider wearing protective gear such as a helmet, knee pads, and elbow pads, especially if you’re new to Heelys or are practicing tricks.
Step 2: Remove the Existing Wheels
Once you have all your materials ready, it’s time to remove the existing wheels from your Heelys. Follow these steps:
Step 2.1: Locate the Axle Bolts
Flip your Heelys over and locate the axle bolts on the bottom of each shoe. These bolts secure the wheels in place and need to be removed to take off the old wheels.
Step 2.2: Loosen the Axle Bolts
Using a small wrench or Allen key that fits the axle bolts, turn each bolt counterclockwise to loosen them. Be careful not to strip the bolts or apply too much force, as this could damage the threads.
Step 2.3: Take off the Wheels
Once the bolts are loose, gently pull the wheels straight out of the sockets. If the wheels are stubborn, you can use a twisting motion while pulling to help release them. Set aside the old wheels in a safe place.
Step 3: Install the New Wheels
With the old wheels removed, it’s time to install the new ones. Follow these steps:
Step 3.1: Insert the New Wheels
Take one of the new wheels and align it with the wheel socket on the bottom of your Heelys. Push the wheel firmly into place, ensuring that it sits securely.
Step 3.2: Tighten the Axle Bolts
Using the wrench or Allen key, turn each axle bolt clockwise to tighten them. Make sure not to overtighten, as this can lead to difficulty in removing the wheels in the future. The wheels should be secure but still able to rotate freely.
Step 3.3: Repeat for the Other Shoe
Repeat steps 3.1 and 3.2 for the other shoe, installing the remaining new wheel. Ensure that both wheels are securely in place and rotate smoothly.
Step 4: Test the Wheels
With the new wheels installed, it’s important to test them before you start gliding and rolling. Put on your Heelys and find a flat, smooth surface to try them out. Gently shift your weight to the back of your feet, and you should feel the wheels engage. Start with small glides and gradually increase your speed and confidence.
Step 4.1: Practice and Safety
As with any new skill, it’s essential to practice and take safety precautions. Start by practicing in a controlled environment, such as an empty parking lot or a smooth indoor surface. Take your time and focus on maintaining balance and control. Remember to wear protective gear and follow safety guidelines to minimize the risk of accidents.
Step 4.2: Maintenance and Care
To ensure optimal performance and longevity of your Heelys wheels, it’s crucial to maintain and care for them properly. Regularly inspect the wheels for wear and tear, and replace them as needed. Keep the wheel sockets clean and free of debris, as this can affect their rotation. Additionally, avoid excessive moisture or extreme temperatures, as these can impact the wheel’s performance.
By following these steps, you can easily put wheels on your Heelys and enjoy gliding and rolling to your heart’s content. Remember to choose the right wheels for your needs, take safety precautions, and practice regularly to improve your skills. Now that you know how to put wheels on Heelys, it’s time to get rolling and have fun!
Key Takeaways: How to Put Wheels on Heelys?
– Remove the existing wheel by using the skate tool to unscrew the axle nut.
– Insert the new wheel onto the axle and secure it with the axle nut.
– Tighten the axle nut using the skate tool to ensure the wheel is securely attached.
– Repeat the process for the remaining wheels, making sure they are all properly installed.
Frequently Asked Questions
Can I put wheels on my Heelys?
Yes, you can put wheels on your Heelys. In fact, Heelys are designed to have removable wheels so that you can switch between walking and rolling. To put wheels on your Heelys, you will need a wheel removal tool, which usually comes with the shoes. If you don’t have one, you can purchase it separately. Follow these steps to put wheels on your Heelys:
1. Locate the wheel brackets on the bottom of your Heelys. They are usually positioned towards the back of the shoe.
2. Insert the wheel removal tool into the small hole on the wheel bracket and push down firmly. This will release the wheel from the bracket.
3. Take one of the replacement wheels and align it with the wheel bracket. Make sure the wheel is facing the correct direction (the side with the Heelys logo should face outwards).
4. Push the wheel onto the bracket until it clicks into place. Repeat this process for the other wheel.
Once you have successfully put the wheels on your Heelys, make sure they are securely attached before using them for rolling. Always check the wheels and brackets regularly to ensure they are in good condition and properly maintained.
Are there different types of wheels for Heelys?
Yes, there are different types of wheels available for Heelys. The type of wheel you choose depends on your preferences and the type of terrain you will be using your Heelys on. Here are some common types of Heelys wheels:
1. Street Wheels: These wheels are designed for outdoor use on smooth surfaces such as sidewalks and pavements. They provide a smooth and fast ride.
2. Fats Wheels: Fats wheels are larger and wider than street wheels, providing more stability and control. They are suitable for beginners or those who prefer a more stable ride.
3. Aggressive Wheels: Aggressive wheels are designed for skatepark use and aggressive skating. They have a harder and more durable construction to withstand tricks and jumps.
Before purchasing new wheels for your Heelys, make sure to check the compatibility with your specific model. Some Heelys may have specific wheel sizes or types that are recommended by the manufacturer.
How often should I replace the wheels on my Heelys?
The frequency of wheel replacement for your Heelys depends on several factors, including how often you use them and the type of terrain you use them on. As a general guideline, it is recommended to replace the wheels on your Heelys every 3-6 months if you use them regularly.
However, there are some signs that indicate the need for immediate wheel replacement, such as excessive wear, cracks, or damage to the wheels. If you notice any of these signs, it is best to replace the wheels as soon as possible to ensure safe and optimal performance.
Regular maintenance and cleaning of the wheels can also help prolong their lifespan. Keep the wheels clean and free from debris, and avoid using them on rough or uneven surfaces that can cause excessive wear.
Can I customize the wheels on my Heelys?
Yes, you can customize the wheels on your Heelys to add a personal touch or enhance their appearance. There are various ways to customize Heelys wheels:
1. Wheel Inserts: Wheel inserts are small decorative pieces that can be inserted into the wheel hub. They come in different colors and patterns, allowing you to customize the look of your Heelys.
2. Wheel Wraps: Wheel wraps are adhesive sheets that can be applied to the outer surface of the wheels. They come in a wide range of designs and colors, giving you the freedom to create a unique look.
3. Custom Paint: If you are feeling creative, you can paint the wheels of your Heelys using acrylic or spray paint. Make sure to use paint that is suitable for the type of wheel material to ensure durability.
Remember to remove the wheels from your Heelys before customizing them and follow the manufacturer’s instructions for any customization products you use. It is also important to note that customization may void any warranty on your Heelys, so proceed with caution.
Are there any safety precautions I should take when putting wheels on my Heelys?
When putting wheels on your Heelys, it is important to take certain safety precautions to ensure a proper and safe installation. Here are some tips to follow:
1. Read the Instructions: Before attempting to put wheels on your Heelys, carefully read the instructions provided by the manufacturer. This will help you understand the proper installation process and any specific guidelines.
2. Use the Wheel Removal Tool: Always use the wheel removal tool that comes with your Heelys or purchase a compatible one. Using other tools or improper methods may damage the shoes or wheels.
3. Check for Proper Alignment: Make sure the wheels are aligned correctly with the wheel brackets before pushing them into place. Improper alignment may cause the wheels to wobble or become loose during use.
4. Test the Wheels: After installing the wheels, give them a gentle spin to ensure they rotate smoothly and freely. If there is any resistance or grinding, double-check the installation and make any necessary adjustments.
By following these safety precautions, you can ensure a proper and secure installation of wheels on your Heelys, enhancing your overall skating experience while minimizing the risk of accidents or injuries.
Final Thoughts
Now that you know how to put wheels on Heelys, you’re ready to roll and experience the thrill of gliding effortlessly. It’s time to take your Heelys game to the next level and turn heads as you zoom past with style and confidence. Remember, safety always comes first, so make sure to wear protective gear and practice in a safe and open area until you feel comfortable.
Putting wheels on Heelys is a straightforward process that anyone can do. Just follow the steps we’ve outlined and you’ll be skating around in no time. Whether you’re a beginner or a seasoned Heelys enthusiast, adding wheels to your shoes opens up a whole new world of fun and adventure.
So, go ahead and grab your Heelys, gather your friends, and hit the pavement. Embrace the freedom and excitement that comes with gliding effortlessly on wheels. With a little practice, you’ll be performing tricks and maneuvers that will leave everyone in awe. Get ready to roll and enjoy the ride!