
If you’re an avid golfer, you know the importance of having the right equipment to enhance your performance on the course. One crucial piece of equipment that can greatly impact your game is your golf shoes. Specifically, the spikes on your Under Armour golf shoes play a vital role in providing traction and stability during your swings. But what do you do when those spikes start to wear out? Fear not, because in this article, we’ll walk you through the process of replacing the spikes on your Under Armour golf shoes, ensuring that you’re always ready to step up to the tee with confidence and style.
When it comes to golf shoes, the spikes are like the tread on a tire – they provide the necessary grip to keep you grounded and prevent slipping on the grass. Over time, these spikes can become worn down or damaged, affecting their effectiveness and potentially compromising your performance on the course. That’s why it’s essential to know how to replace them properly. In this step-by-step guide, we’ll cover everything from identifying when it’s time to replace your spikes to the tools you’ll need and the process itself. So, grab your golf shoes and let’s get started on giving them a much-needed spike makeover!
Replacing spikes on your Under Armour golf shoes is a simple process that can greatly improve your traction on the course. Follow these steps to do it yourself:
- Start by removing the old spikes using a spike wrench or pliers. Twist them counterclockwise until they loosen and can be easily pulled out.
- Clean the spike holes on your shoes using a brush or cloth to remove any dirt or debris.
- Insert the new spikes into the holes, making sure they are aligned properly. Use the spike wrench or pliers to twist them clockwise until they are securely tightened.
- Repeat the process for all the spikes on your shoes.
- Once all the spikes are replaced, take a few practice swings to ensure they are firmly in place.
Now you’re ready to hit the golf course with improved traction and stability on your Under Armour golf shoes!
How to Replace Spikes on Under Armour Golf Shoes?
Under Armour golf shoes are known for their durability and performance on the golf course. However, over time, the spikes on the shoes can wear down and lose their traction. When this happens, it’s important to know how to replace the spikes to maintain optimal performance on the course. In this article, we will guide you through the process of replacing the spikes on your Under Armour golf shoes.
Step 1: Gather the Necessary Tools
Before you begin the spike replacement process, make sure you have all the necessary tools. You will need a spike wrench or a similar tool specifically designed for removing and installing golf shoe spikes. Additionally, it’s a good idea to have a pair of pliers on hand in case you encounter any stubborn spikes that are difficult to remove.
Step 2: Remove the Old Spikes
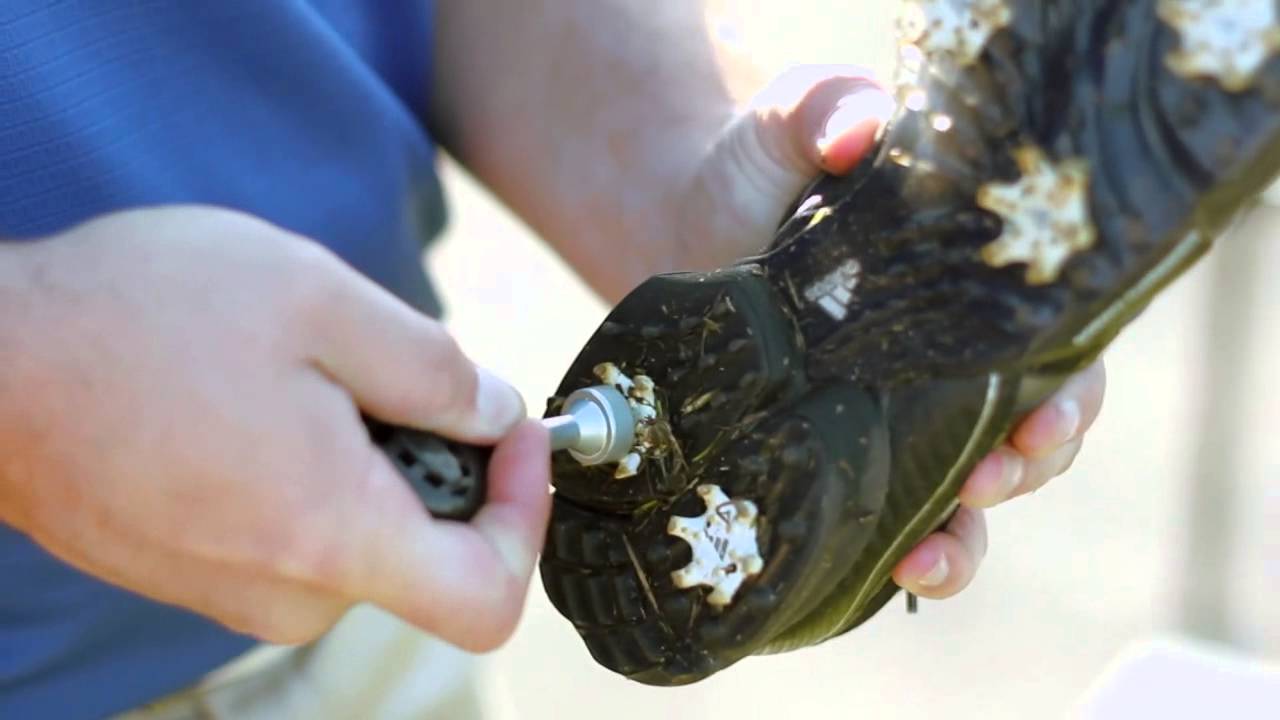
To remove the old spikes, locate the spike receptacles on the sole of your Under Armour golf shoes. These receptacles are typically made of plastic and have a small hole in the center. Insert the spike wrench or the appropriate tool into the hole and twist counterclockwise to loosen the spike. Repeat this process for all the spikes on each shoe.
Once all the spikes are loosened, you can use the pliers to grip the spike and pull it out completely. Be careful not to damage the spike receptacles while removing the spikes. Inspect the receptacles for any debris or dirt and clean them if necessary.
Step 3: Choose and Install the New Spikes
Now that the old spikes are removed, it’s time to choose and install the new spikes. There are different types of spikes available, including metal and plastic options. Consider the playing conditions and your personal preference when selecting the type of spikes.
To install the new spikes, align the spike with the receptacle and insert it into the hole. Use the spike wrench or the appropriate tool to twist the spike clockwise until it is securely in place. Repeat this process for all the spikes on each shoe.
Step 4: Test the Spikes
After installing the new spikes, it’s important to test them to ensure they are properly secured and provide the necessary traction. Take a few practice swings or walk on a surface with different textures to evaluate the grip of the spikes. If any spikes feel loose or do not provide adequate traction, use the spike wrench or the appropriate tool to tighten them further.
Tips for Maintaining Your Under Armour Golf Shoes
– Clean your golf shoes after each round to remove any dirt or debris that may accumulate on the spikes and sole.
– Store your golf shoes in a cool and dry place to prevent moisture buildup and potential damage.
– Regularly inspect the spikes for wear and replace them as needed to maintain optimal traction on the course.
– Consider using spike covers when walking on hard surfaces outside of the golf course to protect the spikes from excessive wear.
Benefits of Replacing Spikes on Under Armour Golf Shoes
Replacing the spikes on your Under Armour golf shoes offers several benefits. Firstly, it restores the traction and stability of your shoes, allowing you to maintain a consistent and powerful swing. Secondly, it prolongs the lifespan of your golf shoes by preventing excessive wear on the sole. Lastly, it enhances your overall golfing experience by providing comfort and confidence on the course.
FAQs about Replacing Spikes on Under Armour Golf Shoes
Q: How often should I replace the spikes on my Under Armour golf shoes?
A: The frequency of spike replacement depends on how often you play and the conditions in which you play. As a general guideline, it’s recommended to replace the spikes every 20-30 rounds or when you notice a significant decrease in traction.
Q: Can I replace the spikes myself, or do I need to take my shoes to a professional?
A: You can replace the spikes yourself with the right tools and instructions. However, if you’re unsure or uncomfortable with the process, it’s always a good idea to seek assistance from a professional or a knowledgeable golf shop.
In summary, knowing how to replace the spikes on your Under Armour golf shoes is essential for maintaining optimal performance on the golf course. By following the steps outlined in this article and regularly inspecting and replacing the spikes as needed, you can ensure that your golf shoes provide the necessary traction and stability for a successful round. So, grab your spike wrench and get ready to hit the course with confidence and style!
Key Takeaways: How to Replace Spikes on Under Armour Golf Shoes?
- Replacing spikes on Under Armour golf shoes is easy and can be done at home.
- Start by removing the old spikes using a spike wrench.
- Clean the spike receptacles thoroughly to ensure a proper fit for the new spikes.
- Insert the new spikes into the receptacles and tighten them with the spike wrench.
- Make sure to check the tightness periodically and replace any damaged spikes.
Frequently Asked Questions
1. How often should I replace the spikes on my Under Armour golf shoes?
It is recommended to replace the spikes on your Under Armour golf shoes every 15-20 rounds of golf or every 6-8 months, depending on how frequently you play and the condition of the spikes. Regularly inspect your spikes to check for wear and tear, as worn-down spikes can affect your grip and stability on the course.
Replacing the spikes in a timely manner will ensure that you maintain optimal performance and prevent any potential injuries caused by poor traction. It is a good practice to schedule spike replacement as part of your regular golf shoe maintenance routine.
2. What tools do I need to replace the spikes on my Under Armour golf shoes?
To replace the spikes on your Under Armour golf shoes, you will need a spike removal tool, which is commonly included in spike replacement kits. This tool helps you easily remove the old spikes from the shoe’s sole. Additionally, you will need replacement spikes that are compatible with your specific Under Armour golf shoe model.
Make sure to read the instructions provided with the spike replacement kit to ensure you have all the necessary tools and materials. It is also recommended to have a clean cloth or brush to remove any dirt or debris from the shoe’s sole before installing the new spikes.
3. How do I remove the old spikes from my Under Armour golf shoes?
To remove the old spikes from your Under Armour golf shoes, first, locate the small holes on the sole of the shoe where the spikes are inserted. Then, using the spike removal tool, insert it into the hole and twist counterclockwise to loosen and remove the old spike.
Repeat this process for each spike until they are all removed. It may require some force to loosen stubborn spikes, but be careful not to damage the shoe’s sole. Once all the old spikes are removed, clean the sole of the shoe using a cloth or brush to remove any dirt or debris.
4. How do I install the new spikes on my Under Armour golf shoes?
Before installing the new spikes, ensure that the holes on the sole of your Under Armour golf shoes are clean and free of debris. Take the replacement spikes and align them with the holes, ensuring they are properly positioned. Insert the spikes into the holes and twist them clockwise until they are securely tightened.
Use the spike removal tool or a small wrench to ensure the spikes are tightened properly. Repeat this process for each spike until all the new spikes are installed. Once all the spikes are in place, give them a gentle tug to ensure they are securely fastened to the shoe’s sole.
5. Can I replace the spikes on my Under Armour golf shoes myself or should I take them to a professional?
Replacing the spikes on your Under Armour golf shoes can be done yourself with the right tools and instructions. Spike replacement kits typically include all the necessary tools and guidelines to make the process easier for you. However, if you are unsure or uncomfortable with performing the task yourself, it is always recommended to seek the assistance of a professional.
A professional shoe repair shop or a golf pro shop can help you replace the spikes on your Under Armour golf shoes efficiently and ensure they are installed correctly. They have the expertise and experience to handle the task professionally, giving you peace of mind and saving you time and effort.
Final Summary: Replacing Spikes on Your Under Armour Golf Shoes Made Easy!
So, there you have it—now you know how to replace the spikes on your Under Armour golf shoes like a pro! With just a few simple steps, you can keep your shoes in top-notch condition and ensure optimal performance on the green. Remember, regular spike maintenance is crucial for maintaining traction and stability, so don’t neglect this important task.
By following our handy guide, you’ll be able to easily remove the old spikes, clean the threads, and install the new ones without any hassle. Whether you’re a seasoned golfer or just starting out, it’s essential to take good care of your equipment, and that includes your golf shoes. With the right tools and a little bit of patience, you’ll be back on the course with confidence, knowing that your Under Armour golf shoes are ready to help you perform at your best.
So, what are you waiting for? Grab your spike removal tool, get those old spikes out, and replace them with fresh ones. Your golf game will thank you, and you’ll be striding the fairways in style with your newly revamped Under Armour golf shoes. Happy golfing!