
Ready to roll? If you’ve got a pair of Heelys and want to switch up your style or replace worn-out wheels, you might be wondering, “How to take Heelys wheels out?” Well, fear not, because I’ve got you covered! In this article, we’ll dive into the step-by-step process of removing the wheels from your Heelys, so you can keep gliding along with ease. Whether you’re a seasoned pro or a newbie to the world of Heelys, this guide will have you wheeling like a pro in no time.
Now, let’s get down to the nitty-gritty of wheel removal. Taking out the wheels from your Heelys is a breeze, and with a few simple steps, you’ll be on your way to swapping them out for a fresh set. No need to be intimidated by the task at hand – it’s easier than you think! So, grab your Heelys, put on your favorite tunes, and let’s get rolling with this easy-peasy process. By the end of this article, you’ll be a wheel-removing expert, ready to take on any Heelys wheel switch-up that comes your way. Get ready to roll in style and comfort!
How to Take Heelys Wheels Out?
Step-by-Step Tutorial:
- Start by locating the wheel cover on the bottom of your Heelys shoes.
- Using a small screwdriver or the edge of a coin, gently pry open the cover.
- Once the cover is removed, you’ll see the wheel secured with a screw.
- Use a screwdriver to loosen and remove the screw.
- With the screw removed, carefully pull the wheel out of its slot.
- Repeat the process for the other wheel.
By following these simple steps, you’ll be able to take the Heelys wheels out and replace them if needed.
How to Take Heelys Wheels Out?
Heelys are a popular type of footwear that combines shoes with removable wheels, allowing wearers to glide around smoothly. Whether you want to replace the wheels or clean them, knowing how to take Heelys wheels out is essential. In this article, we will guide you through the process step by step, ensuring that you can easily remove the wheels without any hassle.
Step 1: Gather the Necessary Tools
Before you begin, it’s important to gather all the necessary tools to make the process smoother. You will need a wrench, pliers, and a flat-head screwdriver. These tools will help you loosen and remove the wheels with ease. Ensure that you have them all within reach before you start.
Step 1.1: Choosing the Right Tools
When selecting a wrench and pliers, make sure they are the right size for the wheel axle. Using the wrong-sized tools can damage the wheels or the axles, making it difficult to remove or replace them. A flat-head screwdriver is essential for prying open the wheel caps or covers.
Step 1.2: Safety First
Before you start working on your Heelys, it’s important to prioritize safety. Find a clear and spacious area to work in, ensuring that you have enough room to maneuver. Also, consider wearing protective gloves to prevent any injuries while removing the wheels. Safety should always be your top priority.
Step 2: Remove the Wheel Caps
To access the wheel axles, you need to remove the wheel caps or covers. Most Heelys have caps that can be easily pried open with a flat-head screwdriver. Gently insert the screwdriver into the small gap between the cap and the shoe, then apply a little pressure to lift the cap off. Be careful not to apply too much force, as you don’t want to damage the cap or the shoe.
Step 2.1: Keep the Caps Safe
When you remove the wheel caps, be sure to keep them in a safe place. Losing the caps can make it difficult to secure the wheels back in place later. You can place them in a small container or bag to keep them organized and prevent them from getting lost.
Step 2.2: Check for Any Dirt or Debris
While the wheel caps are off, take a moment to inspect the area for any dirt or debris. If you notice any, use a cloth or a small brush to clean the area. Removing any dirt or debris will ensure a smooth removal and installation process for the wheels.
Step 3: Loosen the Wheel Axles
With the wheel caps removed, you can now focus on loosening the wheel axles. Use the wrench and pliers to loosen the axle nuts on both sides of the wheels. Grip the axle nut with the pliers and hold it in place while turning the wrench counterclockwise to loosen the nut. Repeat this step for all the wheels.
Step 3.1: Be Gentle
When loosening the axle nuts, be gentle to avoid damaging the axles or the nuts. Applying excessive force can cause them to strip or break, making it difficult to remove or replace the wheels. Use a steady and controlled motion to loosen the nuts without causing any damage.
Step 3.2: Remove the Axle Nuts Completely
Once you have loosened the axle nuts, remove them completely. Set them aside in a safe place, making sure they don’t get lost. Removing the axle nuts will release the wheels from the axles, allowing you to take them out easily.
Step 4: Remove the Wheels
With the axle nuts removed, you can now proceed to remove the wheels from the axles. Hold the shoe firmly and pull the wheel straight out from the axle. If the wheel feels stuck, you can gently wiggle it from side to side while pulling to loosen it. Repeat this step for all the wheels.
Step 4.1: Clean the Wheels
While the wheels are out, take the opportunity to clean them. Use a damp cloth or a brush to remove any dirt or debris from the wheels. Keeping the wheels clean will ensure optimal performance and prolong their lifespan.
Step 4.2: Inspect the Bearings
While you have the wheels out, take a moment to inspect the bearings. Check for any signs of damage or wear and tear. If you notice any issues, it may be time to replace the bearings for a smoother skate experience.
Step 5: Reinstall the Wheels
Once you have cleaned the wheels or replaced the bearings, it’s time to reinstall them. Align the wheel with the axle and push it in firmly until it is secure. Make sure the wheel sits flush against the shoe. Repeat this step for all the wheels.
Step 5.1: Secure the Axle Nuts
After reinstalling the wheels, it’s crucial to secure them properly. Place the axle nuts back onto the axles and tighten them with the wrench and pliers. Hold the axle nut with the pliers and turn the wrench clockwise to tighten the nut. Make sure the wheels are secure and don’t wobble.
Step 5.2: Replace the Wheel Caps
Finally, replace the wheel caps or covers by pressing them firmly into place. Ensure that they are properly aligned and sit snugly on the wheel. This will not only protect the axles but also give your Heelys a finished look.
By following these steps, you can easily take Heelys wheels out and perform any necessary maintenance or replacements. Remember to prioritize safety and take your time throughout the process. With a little practice, you’ll become a pro at removing and reinstalling Heelys wheels. Happy rolling!
Key Takeaways: How to Take Heelys Wheels Out?
- Start by finding a flat, stable surface to work on.
- Use a screwdriver to remove the screws holding the wheels in place.
- Gently pull the wheels out of the frame, using your fingers or pliers if necessary.
- Inspect the wheels and bearings for any damage or wear and replace if needed.
- Securely reattach the wheels by tightening the screws back into place.
Frequently Asked Questions
Here are some frequently asked questions about how to take Heelys wheels out:
1. Can I remove the wheels from my Heelys shoes?
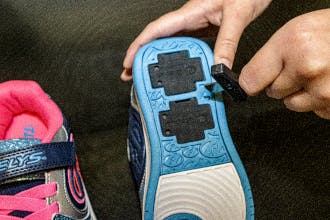
Yes, you can remove the wheels from your Heelys shoes. To do this, you will need a small tool called a wheel removal tool, which is usually included when you purchase a pair of Heelys. Insert the tool into the small hole on the side of the wheel and push down firmly. This will release the wheel from the shoe. Repeat the process for each wheel you want to remove.
It’s important to note that removing the wheels will turn your Heelys shoes into regular sneakers, so you won’t be able to glide or roll with them anymore. However, this can be useful if you want to use your Heelys for walking or running without the wheels.
2. How do I clean my Heelys wheels before removing them?
Before removing your Heelys wheels, it’s a good idea to clean them to ensure smooth operation. Start by removing any dirt or debris from the wheels using a soft brush or cloth. You can also use a mild detergent and warm water to clean the wheels more thoroughly. Gently scrub the wheels with the soapy water, making sure to remove any grime or buildup. Rinse the wheels with clean water and allow them to dry completely before attempting to remove them.
By cleaning your Heelys wheels before removing them, you’ll ensure that they are in good condition and ready for use in the future if you decide to reassemble your shoes with the wheels.
3. Can I remove the wheels without a wheel removal tool?
While it’s recommended to use a wheel removal tool to remove the wheels from your Heelys shoes, it is possible to remove them without one. One method is to use a small flathead screwdriver or a similar tool that can fit into the hole on the side of the wheel. Insert the tool into the hole and apply pressure to release the wheel from the shoe. Be careful not to apply too much force, as this can damage the shoe or the wheel.
However, using a wheel removal tool is the safest and easiest way to remove the wheels, as it is specifically designed for this purpose and reduces the risk of damage to your shoes.
4. Can I replace the wheels on my Heelys shoes?
Yes, you can replace the wheels on your Heelys shoes. If your wheels are worn out or damaged, you can purchase replacement wheels from the manufacturer or authorized retailers. To replace the wheels, simply follow the same steps as removing them. Use a wheel removal tool to release the old wheels from the shoe, then insert the new wheels into the wheel slots and push down firmly to secure them in place.
Replacing the wheels on your Heelys shoes can extend their lifespan and ensure optimal performance when gliding or rolling.
5. Are there any safety precautions I should take when removing Heelys wheels?
When removing Heelys wheels, it’s important to take certain safety precautions to avoid injury or damage. First, make sure to remove the wheels on a flat and stable surface to prevent the shoes from rolling or slipping. Additionally, be cautious when using any tools to remove the wheels, as applying too much force or using the wrong tool can cause damage to the shoe or the wheel. If you’re unsure about the process, it’s always best to consult the manufacturer’s instructions or seek assistance from a professional.
By following these safety precautions, you can safely remove the wheels from your Heelys shoes without any accidents or mishaps.
How to pop your Heelys wheels in and out
Final Summary: Taking Heelys Wheels Out is a Breeze!
Now that you’ve learned all about how to take Heelys wheels out, you’re well-equipped to embark on this fun and practical adventure. It’s as easy as 1-2-3! Remember, safety comes first, so make sure to follow the proper steps and take your time. With a few simple tools and a bit of patience, you’ll have those wheels out in no time.
Taking out the wheels of your Heelys not only allows you to switch between walking and rolling, but it also gives you the opportunity to customize your shoes with different colored or patterned wheels. So go ahead and express your unique style while enjoying the thrill of gliding around effortlessly.
In conclusion, with the knowledge you’ve gained, you’re ready to conquer the task of taking the wheels out of your Heelys. Don’t forget to have fun along the way, and remember that practice makes perfect. So lace up those shoes, remove those wheels, and let the adventures begin! Happy Heely-ing!