
So, you’ve got a pair of Clarks shoes that you absolutely love, but they’re starting to look a bit worse for wear. Don’t worry, my friend! I’ve got just the solution for you. In this article, we’re going to dive into the world of Clarks shoe cleaner and learn how to use it effectively to bring your beloved shoes back to life.
Now, I know what you’re thinking. Cleaning shoes? How hard can it be? Well, my friend, it’s not just about splashing some water on them and calling it a day. Clarks shoe cleaner is specially formulated to tackle dirt, stains, and scuffs while still being gentle on your precious footwear. So, if you’re ready to give your Clarks shoes the TLC they deserve, let’s jump right into it and discover the secrets of using Clarks shoe cleaner like a pro.
First things first, gather all the materials you’ll need for this shoe-cleaning adventure. Grab your Clarks shoe cleaner, a soft brush or cloth, and a bowl of lukewarm water. Now, let’s get down to business. Start by removing any loose dirt or debris from your shoes using the brush or cloth. Once that’s done, dampen the brush or cloth with a bit of water and apply a small amount of the Clarks shoe cleaner. Gently work the cleaner into the surface of your shoes, focusing on any stubborn stains or scuffs. Remember, a little goes a long way, so there’s no need to go overboard with the cleaner. After you’ve given your shoes a good scrub, rinse off the cleaner with clean water and pat them dry with a towel. And voila! Your Clarks shoes are now clean and ready to hit the town in style.
- Start by removing any loose dirt or debris from the shoes using a soft brush or cloth.
- Apply a small amount of Clarks Shoe Cleaner onto a damp cloth or sponge.
- Gently rub the cleaner onto the shoes, focusing on any stains or spots.
- For tougher stains, you can use a soft brush to scrub the affected areas.
- Rinse off the cleaner with water and remove any excess moisture with a dry cloth.
- Allow the shoes to air dry completely before wearing or storing them.
How to Use Clarks Shoe Cleaner?
Clarks shoe cleaner is a popular product that helps to keep your shoes looking clean and fresh. Whether you have a pair of Clarks shoes or any other brand, using a shoe cleaner can help to extend their lifespan and maintain their appearance. In this article, we will guide you through the steps on how to effectively use Clarks shoe cleaner to get the best results.
Step 1: Prepare Your Shoes
Before you start cleaning your shoes, it’s important to prepare them properly. Begin by removing any loose dirt or debris from the surface of your shoes. Use a soft brush or cloth to gently brush off any dirt or dust. This step is essential as it helps to prevent further damage to the material when you start cleaning.
Once you have removed the dirt, check for any stains or specific areas that require extra attention. Make sure to identify the type of material your shoes are made of, as different materials may require different cleaning methods. It’s always a good idea to check the care instructions provided by the manufacturer for specific guidance.
Step 1.1: Stain Removal
If you notice any stubborn stains on your shoes, it’s important to address them before proceeding with the cleaning process. You can use a stain remover specifically designed for shoes or create a homemade solution using mild soap and warm water. Apply the stain remover to the affected area and gently rub it in using a soft cloth or sponge. Allow it to sit for a few minutes before rinsing it off with clean water.
Step 1.2: Test in an Inconspicuous Area
Before applying any shoe cleaner to the entire shoe, it’s always a good idea to test it in a small, inconspicuous area. This will ensure that the cleaner does not cause any discoloration or damage to the material. Apply a small amount of the shoe cleaner to the test area and wait for a few minutes. If there are no adverse effects, you can proceed with cleaning the rest of your shoes.
Step 2: Apply the Shoe Cleaner
Now that your shoes are prepared, it’s time to apply the Clarks shoe cleaner. Shake the bottle well to ensure that the formula is mixed properly. Then, squeeze a small amount of the cleaner onto a soft cloth or sponge. Start by applying the cleaner to one section of the shoe and work your way around, covering the entire surface.
Use gentle, circular motions to work the cleaner into the material. Pay extra attention to any particularly dirty or stained areas. If you’re cleaning leather shoes, be careful not to apply too much pressure, as it may cause damage. For fabric or suede shoes, use a soft brush to work the cleaner into the material.
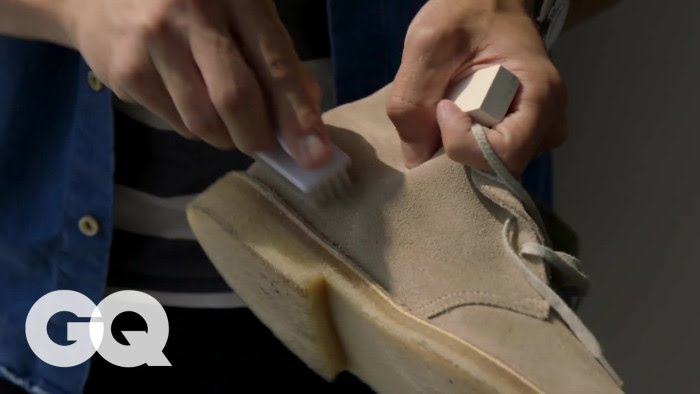
Step 2.1: Extra Tips for Suede Shoes
If you’re cleaning suede shoes, there are a few additional tips to keep in mind. Firstly, avoid using too much water or liquid cleaner, as it can leave water stains on the material. Instead, use a suede brush or eraser to gently remove any dirt or stains. You can also use a suede protector spray after cleaning to help maintain the material’s appearance.
Step 2.2: Cleaning the Soles
While focusing on the upper part of the shoe, don’t forget to clean the soles as well. The soles can accumulate dirt and grime over time, which can affect the overall cleanliness of your shoes. Use a brush or cloth to scrub the soles, paying attention to any grooves or crevices. You can also use a toothbrush for more precise cleaning.
Step 3: Rinse and Dry
After applying the shoe cleaner, it’s time to rinse off any residue and dry your shoes. Use a damp cloth or sponge to wipe away the cleaner from the surface of your shoes. Make sure to remove all traces of the cleaner, as any leftover residue can attract dirt and make your shoes appear dull.
Once your shoes are clean, allow them to air dry naturally. Avoid exposing them to direct sunlight or using heat sources such as hairdryers, as this can cause the material to shrink or become damaged. It’s best to place your shoes in a well-ventilated area and let them dry completely before wearing them again.
Step 3.1: Stuffing Your Shoes
To help your shoes maintain their shape while drying, it’s a good idea to stuff them with newspaper or shoe trees. This will prevent them from losing their shape and ensure a proper fit when you wear them again. Make sure not to overstuff them, as it can cause the material to stretch or warp.
Step 3.2: Applying Shoe Polish (Optional)
If you want to give your shoes an extra shine and protection, you can apply a shoe polish after they have dried. Choose a polish that matches the color of your shoes and apply it using a soft cloth or brush. Follow the instructions provided by the manufacturer for the best results.
Using Clarks shoe cleaner is a simple and effective way to keep your shoes looking their best. By following these steps, you can maintain the cleanliness and appearance of your shoes, ensuring that they last for years to come. Remember to always read the instructions provided with the shoe cleaner and test it on a small area before applying it to the entire shoe.
Key Takeaways: How to Use Clarks Shoe Cleaner?
- Start by removing any dirt or debris from your shoes with a soft brush.
- Apply a small amount of Clarks Shoe Cleaner to a clean cloth or sponge.
- Gently scrub the cleaner onto the surface of your shoes in circular motions.
- Pay extra attention to stained or soiled areas, applying more cleaner if needed.
- After cleaning, wipe off any excess cleaner with a clean, damp cloth and let your shoes air dry.
Frequently Asked Questions
Here are some common questions and answers on how to use Clarks Shoe Cleaner:
Question 1: Can I use Clarks Shoe Cleaner on all types of shoes?
Answer: Yes, Clarks Shoe Cleaner can be used on various types of materials including leather, suede, nubuck, and canvas. However, it is always recommended to test the cleaner on a small, inconspicuous area of the shoe before applying it all over. This will ensure that the cleaner does not cause any discoloration or damage to the shoe.
When using Clarks Shoe Cleaner on delicate materials like suede or nubuck, it is important to be gentle and use a soft brush or sponge to avoid any potential damage. For leather shoes, you can use a slightly firmer brush to remove stubborn stains or dirt.
Question 2: How do I apply Clarks Shoe Cleaner?
Answer: To use Clarks Shoe Cleaner, start by removing any loose dirt or debris from the shoe’s surface. Then, apply a small amount of the cleaner onto a clean, damp cloth or sponge. Gently rub the cleaner onto the shoe in circular motions, focusing on any areas with stains or dirt buildup.
After applying the cleaner, use a damp cloth or sponge to wipe away any excess product. It is important to avoid saturating the shoe with water, as this can damage certain materials. Allow the shoe to air dry before wearing or applying any protective products.
Question 3: Can I use Clarks Shoe Cleaner on colored or patterned shoes?
Answer: Clarks Shoe Cleaner is safe to use on colored or patterned shoes. However, it is always recommended to test the cleaner on a small, inconspicuous area first to ensure it does not cause any fading or discoloration. Apply the cleaner gently and avoid excessive scrubbing, as this can potentially remove color or damage delicate patterns.
If you are unsure about using the cleaner on a specific shoe, it is best to consult the manufacturer’s recommendations or seek professional advice.
Question 4: How often should I clean my shoes with Clarks Shoe Cleaner?
Answer: The frequency of cleaning your shoes with Clarks Shoe Cleaner depends on how often you wear them and the conditions they are exposed to. As a general rule, it is recommended to clean your shoes every few weeks or when they appear dirty or stained.
If you live in an area with harsh weather conditions or frequently wear your shoes in challenging environments, you may need to clean them more often. Regular cleaning and maintenance can help prolong the lifespan of your shoes and keep them looking their best.
Question 5: Can I use Clarks Shoe Cleaner on other leather accessories?
Answer: Yes, Clarks Shoe Cleaner can be used on other leather accessories such as bags, belts, and wallets. The same cleaning process mentioned earlier can be applied to these items as well. However, it is always advisable to check the manufacturer’s instructions or test the cleaner on a small, inconspicuous area before proceeding with a full clean.
When using Clarks Shoe Cleaner on leather accessories, it is important to be gentle and avoid excessive scrubbing. After cleaning, wipe away any excess product and allow the item to air dry. Following these steps will help maintain the quality and appearance of your leather accessories.
How To Clean SUPER DIRTY Clark Wallabees With Reshoevn8r
Final Thoughts on How to Use Clarks Shoe Cleaner?
Now that you know the ins and outs of using Clarks Shoe Cleaner, you’re ready to bring new life to your favorite pairs of shoes! With just a few simple steps, you can keep your footwear looking fresh and clean, ensuring they last for years to come.
First, remember to always start by removing any loose dirt or debris from your shoes. This will prevent the cleaner from spreading and making a bigger mess. Then, apply a small amount of the Clarks Shoe Cleaner onto a soft brush or cloth. Gently work the cleaner into the leather or fabric, focusing on any areas that are particularly dirty or stained. Once you’ve covered the entire surface, use a clean damp cloth to wipe away any excess cleaner. Allow your shoes to air dry, away from direct heat sources, and voila! Your shoes will be looking as good as new.
By following these simple steps and incorporating Clarks Shoe Cleaner into your shoe care routine, you’ll not only keep your footwear looking great but also extend their lifespan. So, go ahead and give your shoes the TLC they deserve. Your feet (and your style) will thank you!
Remember, a little goes a long way when it comes to shoe cleaning, so be sure to use the right amount of cleaner and avoid over-saturating your shoes. With proper care and maintenance, your Clarks shoes will continue to be a reliable and stylish companion for many adventures to come. Happy shoe cleaning!