
If you’ve ever struggled with tying your Puma shoe laces, you’re in the right place! In this article, we’ll dive into the world of Puma shoe laces and discover the best techniques to tie them securely and stylishly. Whether you’re a seasoned sneakerhead or just looking to up your shoe game, we’ve got you covered. So grab your favorite pair of Puma kicks and let’s get started on mastering the art of tying Puma shoe laces!
When it comes to tying Puma shoe laces, there’s more to it than meets the eye. It’s not just about making sure your shoes stay on your feet, but also about adding a touch of personal flair to your style. With a few simple steps, you’ll be able to tie your Puma shoe laces like a pro and impress everyone with your sneaker game. So let’s jump right into it and discover the secrets behind the perfect Puma shoe lace knot. Get ready to step up your shoe game and make a statement with every step you take!
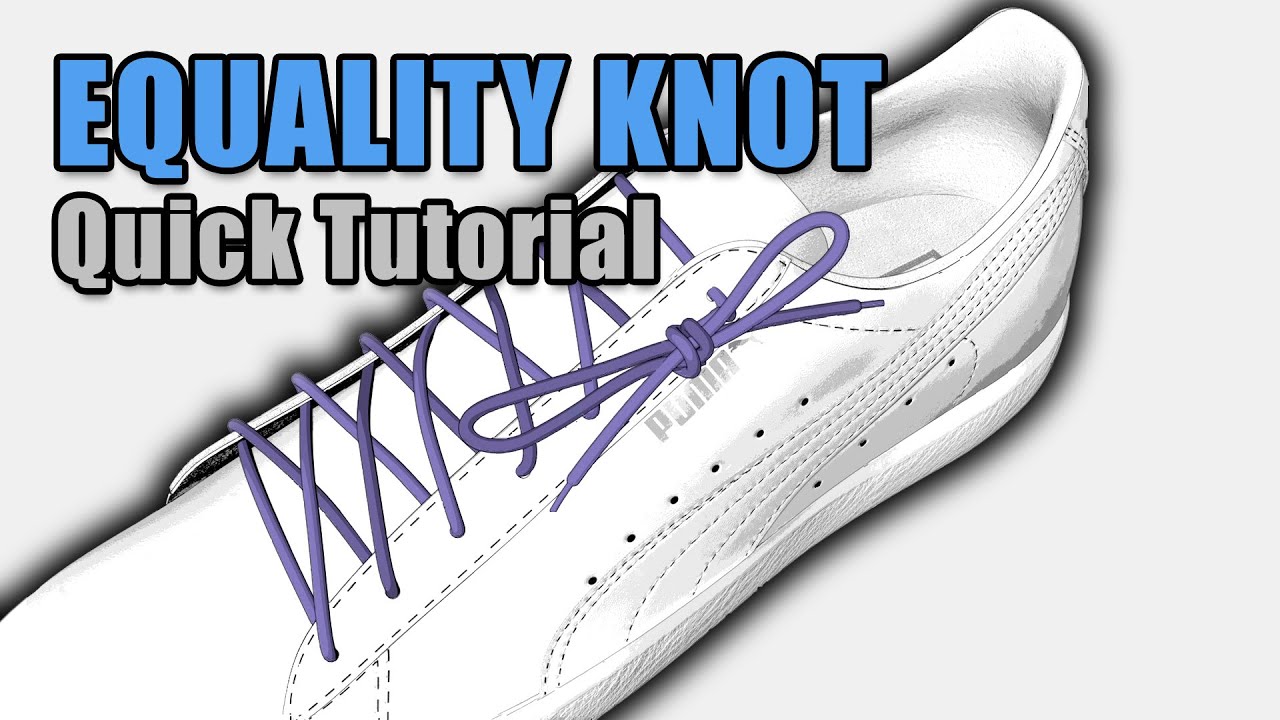
- Start by crossing the laces over each other and pulling them tight.
- Create a loop with one lace and hold it with your thumb and index finger.
- Take the other lace and wrap it around the loop, going under and then over.
- Pull the second lace through the loop you created.
- Hold the ends of both laces and pull them tight to secure the knot.
How to Tie Puma Shoe Laces?
Puma shoes are known for their style and functionality, and one important aspect of wearing Puma shoes is knowing how to tie the laces properly. Tying your Puma shoe laces correctly not only ensures a secure and comfortable fit but also adds a touch of style to your overall look. In this article, we will guide you through the steps to tie Puma shoe laces effectively.
Step 1: Start with a Cross
To begin, hold one lace end in each hand and cross them over each other to form an X shape. Ensure that the lace on your left hand crosses over the lace on your right hand. Hold the crossover point with your thumb and index finger to maintain the position.
Next, take the right lace and bring it under the left lace, creating a loop with the right lace. Hold the loop with your right hand.
Step 1.1: Secure the Loop
With your left hand, take the left lace and thread it through the loop created by the right lace. Pull the left lace tight while still holding the loop with your right hand. This will secure the loop in place.
Step 1.2: Create the First Knot
Now, take the loop in your right hand and pass the right lace through the loop from the bottom, creating a knot. Hold the knot with your right hand and pull both laces gently to tighten the knot. You have now created the first knot.
Step 2: Create the Second Knot
To create the second knot, take the right lace and create another loop by folding it over itself. Hold the loop with your right hand.
Step 2.1: Thread the Left Lace
With your left hand, take the left lace and thread it through the loop created by the right lace. Pull the left lace tight while still holding the loop with your right hand. This will secure the loop in place.
Step 2.2: Complete the Second Knot
Next, take the loop in your right hand and pass the right lace through the loop from the bottom, creating the second knot. Hold the knot with your right hand and pull both laces gently to tighten the knot.
Step 3: Finishing Touches
After creating the second knot, you can adjust the tightness of the laces by pulling the ends gently. Ensure that the laces are tight enough to provide a secure fit but not too tight to restrict movement or cause discomfort. Tie an additional knot if necessary to achieve the desired level of tightness.
Once you are satisfied with the fit, tuck the remaining lace ends into the sides of your shoes to prevent them from coming undone or getting tangled during activities. This will give your Puma shoes a clean and neat appearance.
Benefits of Properly Tying Puma Shoe Laces
Tying your Puma shoe laces correctly offers several benefits. Firstly, it ensures a secure and comfortable fit, preventing your shoes from slipping off or causing discomfort while wearing them. Secondly, properly tied laces enhance your performance during physical activities by providing stability and support to your feet. Lastly, tying your Puma shoe laces in a neat and stylish manner adds a touch of sophistication to your overall look.
Tips for Tying Puma Shoe Laces
To tie your Puma shoe laces effectively, keep the following tips in mind:
1. Make sure to start with laces of equal length to achieve a balanced and symmetrical look.
2. Pull the laces tight enough to provide a secure fit but avoid overtightening, as it may cause discomfort.
3. Regularly check the tightness of your laces throughout the day, especially during physical activities, to ensure they remain secure.
4. Experiment with different lacing techniques to add variety and style to your Puma shoes.
5. Replace worn-out or damaged laces to maintain the functionality and aesthetics of your Puma shoes.
Remember, tying your Puma shoe laces properly is not only about functionality but also about personal style. Embrace the opportunity to express yourself through the way you tie your laces and make a fashion statement with your Puma shoes.
Now that you know how to tie Puma shoe laces, you can confidently step out in style and enjoy the comfort and support that Puma shoes provide. Practice the steps mentioned in this article and master the art of tying Puma shoe laces like a pro.
Key Takeaways – How to Tie Puma Shoe Laces?
- Tying Puma shoe laces is easy and fun!
- Start by crossing the laces over each other.
- Create a loop with one lace and hold it in place.
- Take the other lace and wrap it around the loop.
- Pull the ends of the laces to tighten the knot.
Frequently Asked Questions
Q1: Can you explain the basic method of tying Puma shoe laces?
Tying Puma shoe laces is a simple process that can be done in a few easy steps. Start by inserting one end of the lace through the bottom-left eyelet from the outside, and then thread it across to the bottom-right eyelet. Make sure the lace is pulled tight and even on both sides.
Next, cross the ends of the lace and insert each end through the next set of eyelets on the opposite side. Repeat this process until you reach the top of the shoe. Finally, tie a knot with the ends of the lace to secure it in place. Adjust the tightness as needed, and you’re done!
Q2: Are there any alternative ways to tie Puma shoe laces?
Yes, there are several alternative ways to tie Puma shoe laces, depending on your preference and style. One popular method is the “bunny ears” technique. After crossing the ends of the lace, instead of inserting them through the next set of eyelets, make a small loop with each end. Cross the loops over each other and insert them through the opposite loops. Pull the loops tight to secure the lace.
Another option is the “bar” lacing technique, which creates a unique look. Start by inserting one end of the lace through the bottom-left eyelet from the outside, and then thread it straight up to the top-right eyelet. Repeat this process on the other side, crossing the lace over the top of the shoe. Continue lacing in this manner until you reach the top, and tie a knot to secure it.
Q3: How can I make sure my Puma shoe laces stay tied throughout the day?
To ensure that your Puma shoe laces stay tied throughout the day, there are a few tips you can follow. First, make sure to tie a tight knot using the standard or alternative tying methods mentioned earlier. This will provide a secure hold.
You can also consider using double knots for added security. After tying a standard knot, make an additional loop with each end of the lace and tie them together in a second knot. This will help prevent the laces from coming undone.
Q4: Can I use different lacing techniques for different types of Puma shoes?
Yes, you can definitely experiment with different lacing techniques for different types of Puma shoes. Certain lacing techniques may work better for specific shoe styles or provide a unique look. For example, the “bar” lacing technique mentioned earlier is often used for high-top sneakers to create a distinctive crisscross pattern.
It’s always a good idea to try out different techniques and see which one suits your shoes and personal style the best. Just remember to ensure the laces are secure and comfortable when trying out new lacing methods.
Q5: Are there any special care instructions for Puma shoe laces?
Puma shoe laces can be cared for in a similar way to the shoes themselves. If the laces become dirty or stained, you can gently hand wash them with mild soap and water. Avoid using harsh chemicals or abrasive materials that could damage the laces.
It’s also a good idea to regularly check the condition of your Puma shoe laces and replace them if they become frayed or worn out. This will not only ensure your shoes look their best but also help maintain the functionality and longevity of the laces.
HOW TO LACE PUMA SUEDE CLASSIC SHOES !!! @Puma @DjDelz
Final Summary: Master the Art of Tying Puma Shoe Laces!
So, there you have it, folks! We’ve covered everything you need to know about tying Puma shoe laces like a pro. From the basic knot to the stylish bunny ears technique, you’re now equipped with the skills to keep your Pumas snug and secure on your feet. Whether you’re an athlete looking to optimize your performance or a fashion enthusiast aiming for that perfect sneaker look, mastering the art of tying Puma shoe laces is essential.
Remember, practice makes perfect! Don’t be discouraged if you struggle at first. Keep trying different methods and find what works best for you. Experiment with different lace patterns and colors to express your unique style. And most importantly, have fun with it! Tying your shoelaces shouldn’t be a chore but rather a moment of self-expression and creativity.
So go ahead, put your newfound knowledge into action, and rock those Puma shoes with confidence. Whether you’re hitting the gym, strolling through the park, or strutting your stuff on the streets, let your perfectly tied Puma shoe laces be a testament to your style and attention to detail. Happy lacing, and may you walk with confidence every step of the way!